SPUI - SimPle UI
SPUI is a library using an hyperscript syntax that helps create dom ui and automatically update when model changes. SPUI is fully DOM based (NOT vdom).
Buzzwords and hype galore
SPUI is simple, small (about 600 LOC) and blazing fast (tm). And it is yet another UI framework. This is my rite of passage as a web developer.
Introduction
The goal of SPUI is to make it easy to create web application without relying on external templating library (mustache), or template compiler (jsx). All code is pure Javascript and uses the Document Object Model (DOM). This is not a VirtualDom library. I found that working closely with the DOM without having an intermediary abstraction like a VDOM helps get things done more easily.
SPUI comes with a Stream module that makes it easy to define two way data bindings that will update the DOM automatically when model values are modified.
The SPUI streams enable that kind of workflow:
// Label that updates automatically when a user types in an input field.
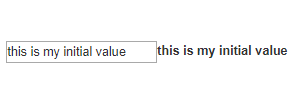
const model = valueStream('this is my initial value');
h('div', {}, [
h('input', { value: model, oninput: selectTargetAttr('value', model) }),
h('label', {}, model)
]);
Installation
npm install spui --save-dev
dist/spui.js contains the whole library. It is published as a UMD module.
Getting Started
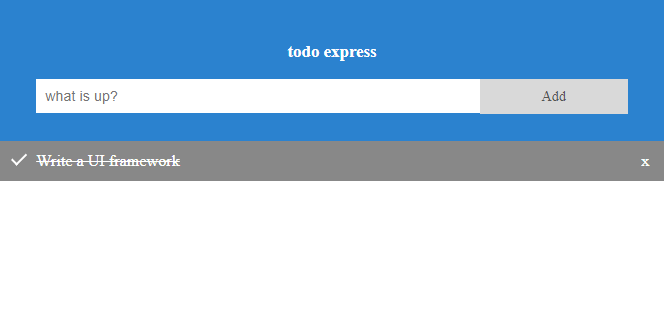
SPUI is basically an hyperscript function named h and a stream api to notify the DOM when model changes. The best way to dive into SPUI is to look at a dead simple TODO application example:
First we create a stream that will store whatever the user types in an <input> field:
const newTitle = sp.valueStream('');
Then we create an ObservableArray that will store our list of Todo models. When this list is mutated (if we add or remove from it) the DOM will be notified and updated accordingly:
const todos = new sp.ObservableArray();
Now let’s add a function to add new todos to our list:
function addTodo() {
    if (newTitle()) {
        todos.push(createTodo(newTitle()));
        newTitle('');
    }
};
Notice how our stream newTitle is a getter/setter function. When called without argument it returns its backing value. When called with a single argument, it updates its backing value and notify all listeners about it.
We then add an helper function to create new todo:
function createTodo (title: string, done = false) {
    return {
        title: sp.valueStream(title),
        done: sp.valueStream(done)
    };
}
Notice how title and done are implemented as streams: this means modifying thoses values will trigger a notification that will keep the DOM up to date.
It is now time to create a view using the hyperscript h function:
const view = h('div', { id: 'todoapp'}, [
    h('div', {class: 'header'}, [
        h('h3', {}, 'todo express'),
        h('input', { type: 'text',
                    // `newTitle` is used as a getter here. Each time it will be change
                    // the 'value' property will be updated as well.
                    value: newTitle,
                    placeholder: 'what is up?',
                    // `newTitle` is used as a setter each time a new character is typed.
                    // `targetAttr` is just an helper to extract the 'value` property
                    // from the event target.
                    oninput: sp.targetAttr('value', newTitle)
        }),
        // You can hook on to any dom events by adding an attribute prefixed with `on`
        h('span', { class: 'addBtn', onclick: addTodo }, 'Add'),
    ]),
    // This is how SPUI handles list of elements: we bind the ObservableArray to an Element list:
    sp.elementList('ul', {}, todos, (listNode: HTMLElement, todo: Todo) => {
        // This is the function that is called any time a new DOM element needs to be constructed
        // for a new Todo object.
        return h('li', { class: { checked: todo.done },
                         onclick: () => todo.done(!todo.done()) }, [
            todo.title,
            // ObservableArray has a nifty remove function that will remove the Todo from the list
            // and notify the DOM about it:
            h('span', {class: 'close', onclick: () => todos.remove(todo)}, 'x')
        ]);
    })
]);
All that is left is to hook the view on to the body of the Document. Since the result of h is an HTMLElement it is as easy as this:
document.body.appendChild(view);
And that’s it! We now have a todo application (like a million other ones):
Check here to see the complete source of the examples.
More Examples
More complete examples can be found below:
- SPUI TODO MVC: the official TODO MVC has been implemented for SPUI will all kinds of nifty TODO workflows.
- Table benchmarks and implementation of the world famous JS Framework Benchmarks using SPUI. This implementation is deceptively small and the performance is really good. It will be submitted to the official site soon(ish).
- Markdown Editor: really simple example on how to listen to changes in a
<textarea>and live convert those changes to markdown. - Basic API usages this is a repository of snippets that showcases all the different functions of the SPUI Api. Some of these examples are used in the official Api documentation in the next section.
API
This section covers all the public Api for SPUI. If it becomes out of date (how could that happen?) you can always look at the typescript declaration files here to have access to the actual Api.
DOM Manipulation
These are all the functions that helps create an HTML view and manipulate DOM elements. All of those functions can be used with the stream Api to benefit from automatic update. But you can use the hyperscript h function alone just to quickly create a new static HTML view.
h(tagName, attrs?, children?) -> HTMLElement
| Argument | Type | Required | Description |
|---|---|---|---|
tagname |
string |
Yes | The HTML Element tagname (div, label, button, …) |
attrs |
Object |
No | An Object where all keys are attributes or properties to specify on the HTMLElement |
children |
Array| string | HTMLElement | Function |
No | Children to append to the HTMLElement |
| returns | Returns the newly created HTMLElement |
Description
h is the one stop shop to create a DOM view. This function has a lot of flexibility and intricacies like all hyperscript function can be. At its simplest, h can be seen as a blueprint on how the HTML to build would look:
When you want to produce the following HTML:
<div id='todoapp'>
    <input type='text' placeholder='what is up?' input=myHandler>
    <button click=clickHandler>Add</button>
</div>
you use h like this:
h('div', {id: 'todoapp'}, [
    h('input', {type: 'text', placeholder: 'what is up?', onpinput=myHandler),
    h('button', {onclick: clickHandler}, 'Add')
])
All the intricacies are about specifying the different attributes and children. Keep in mind that the result of h is an HTMLElement. You can use that element directly and manipulate it as you see fit.
General attributes
Attributes are specified as a javascript object where each key must be a string. Each of these key will be used to set an attribute (or property) of the created HTMLElement. The value of each attribute can be either a number, string, boolean or a function. If you specify a function, SPUI will evaluate it to see if it involves Stream evaluation and if so, it will keep a binding on that Stream so when it changes, the DOM attribute will be updated as well. Here is an example of an element attribute:
const model = valueStream('this is my initial value');
h('div', {}, [
    // when the user types into the <input> we update model...
    h('input', { id: 'myInput', placeholder: 'Enter a value' value: model, oninput: targetAttr('value', model) }),
    // ...when model changes, label content updates automatically.
    h('label', {}, model)
]);
class attribute
The class attribute can be specified in multiple ways. Either as a string:
const label = {info: true, danger: false};
h('div', { class: 'alert alert-info' }, 'This is an alert label');
Or as an object where each key is a class to add if the corresponding value is truthy:
const label = {info: true, danger: false};

// This creates the same class as above => 'alert alert-info'
h('div', { class: { alert: true,
                    'alert-info': label.info,
                    'alert-danger': label.danger
        }
    }, 'This is an alert label');
You can speficy a stream either for the whole class value:
const labelClass = valueStream('alert alert-info');
h('div', { class: labelClass }, 'This is an alert label');

// This will update the class attribute to danger!
labelClass('alert alert-danger');
Or for any value of the Object specifying the class:
const isInfo = valueStream(true);
const isDanger = valueStream(false);
h('div', { class: { alert: true,
                    'alert-info': isInfo,
                    'alert-danger': isDanger
        }
    }, 'This is an alert label');

isInfo(false); // class becomes 'alert'
isDanger(true); // class becomes 'alert alert-danger'
style attribute
Style attribute is similar to class attribute in that you can specify it with multiples ways using Stream (or not). It can be specified as a string:
h('div', { style: 'color: black; background-color: grey;padding: 10px;' }, 'dark label #1');
Or as an object where each key is a style attribute:
h('div', { style: { color: 'grey', backgroundColor: 'black', padding: '10px' } }, 'darker label #2');
You can use Stream either for the whole style value or for any style attributes:
// Attribute with a boolean value, are setup specially in the DOM
const colors = ['blue', 'green', 'red', 'black', 'pink'];
const randomColor = () => randomElement(colors);
const color1 = valueStream(randomColor());
const color2 = valueStream(randomColor());
h('div', { class: 'child-container' }, [
    h('button', { onclick: () => {
            color1(randomColor());
            color2(randomColor());
        } }, 'random color'),
    // This is a computed whole style value:
    h('div', { class: 'color-display', style: () => 'background-color: ' + color1() }),
    // pass the Stream directly for the backgroundColor
    h('div', { class: 'color-display', style: { backgroundColor: color2 } })
]);
boolean attributes
Boolean attributes are special in HTML: they need to be specified in the HTMLElementwhen it when they are true and need to be removed from the HTMLElement when false.
<button>Enabled</button>
<button disabled>Disabled</button>
SPUI will ensure all boolean attributes are properly added (or removed) from owning HTMLElement. If you use a Stream to specify the value of the attribute this makes it easy to have it be updated automatically:
// Attribute with a boolean value, are setup specially in the DOM
const readonlyInput = valueStream(true);
const disabledInput = valueStream(true);

h('div', { class: 'child-container' }, [
    // Toggle if `i2` is disabled or not
    h('button', { onclick: () => disabledInput(!disabledInput()) }, 'Toggle'),
    h('input', { id: 'i1', readonly: readonlyInput }),
    h('input', { id: 'i2', disabled: disabledInput }),
]);

// Makes `i1` input writable
readonlyInput(true);
events
Any attribute names beginning with on is assumed to be an handler that will be added as a event listener to the HTMLElement:
let input, button, buttonText = 'Roll D6';
h('div', { class: 'child-container' }, [
    input = h('input', { placeholder: 'this is readonly', readonly: true, value: 1 }),
    // Listener to an event is adding an attribute of name : on<eventName>
    button = h('button', {
        onclick: () => {
            // h() returns an HTMLElement. So it is really easy changing the value of input:
            input.value = randomNumber(6) + 1;
        },
        onmouseenter: () => {
            button.innerText = 'Click to roll';
        },
        onmouseleave: () => {
            button.innerText = buttonText;
        }
    }, buttonText),
]);
children
You can specify children in multiple ways with h. Children can be a single value(string, number, boolean, HTMLElement):
h('div', {}, 'this is a text children');
h('div', {}, 42);
h('div', {},
    h('span', {}, 'hello world')
);
You can also specify a function that will receive the newly created element as a parameter and that must output an HTMLElement:
let parent = h('div', {}, p => {
    // Here p === parent:
    return h('span', {}, 'I am a children');
});
You can also specify a Stream that will update the children value:
const title = valueStream('This is my title');
h('div', {}, title);

title('I have changed'); // Updates the text children node of the HTMLElement
A children value in h can also be an array of any of the above:
const title = valueStream('This is my title');
let parent = h('div', { class: 'child-container' }, [
    'this is a text children',
    title
    p => {
        // Here p === parent:
        return h('span', {}, 'I am a children');
    }
    h('button', {}, 'Button child')
]);
For information on specifying a dynamic list of children see elementList below.
elementList(tagname, attrs, models, elementCreator) -> HTMLElement
| Argument | Type | Required | Description |
|---|---|---|---|
tagname |
string |
Yes | The HTML List Element tagname (div, ul, …) |
attrs |
Object |
Yes | An Object where all keys are attributes or properties to specify on the list Element |
models |
ObservableArray<T> |
Yes | An Array containing all the model objects. |
elementCreator |
Function |
Yes | Function called to create HTMLElement when a model is added to models |
| returns | Returns the newly created list as an HTMLElement |
Description
elementList will create an HTMLElement that listens to models mutating notifications to keep the HTML list up to date. When new model are added to models, elementCreator is invoked to create a new HTML child element add it at the corresponding position in the HTML list. When a model is removed from models the corresponding HTML children is removed as well.
elementCreator has the following signature: (listRootElement: HTMLElement, model: any, index: number) => HTMLElement
listRootElement: this is the parent of the HTMLElement child to create.model: This is the model used to populate the child HTMLElementindex: index of the model in themodelsObservableArray
const models = new ObservableArray();
let count = 0;
h('div', {}, [
    // Add a new value to the models: this will add a new HTML children in the DOM
    h('button', { onclick: () => models.push(valueStream(count++)) }, 'Add'),
    // Remove a random element from models. This will remove the corresponding
    // HTMLElement from the DOM
    h('button', { onclick: () => models.splice(randomIndex(models.array), 1) }, 'Remove random'),
    // elementList will update the <ul> element when new elements are added or removed.
    elementList('ul', {}, models, (listNode, model, index) => {
        // Simple <li> sowing the model value:
        return h('li', {}, model);
    })
]);
targetAttr(eventAttrName, handler) -> (event) => void
| Argument | Type | Required | Description |
|---|---|---|---|
eventAttrName |
string |
Yes | Name of an attribute on event.target. |
handler |
(value) => void |
Yes | A callback that takes the selected attribute as parameters |
| returns | Returns an event handler that can be hooked on to a DOM event. |
Description
This is a helper method used to bind to HTML event in a simpler way. If you use targetAttr when registering a DOM event it extracts from event.target a specific attribute and forward it to a custom handler.
Here is what extracting the checked value would look like without targetAttr:
h('input', { type: 'checkbox', checked: isChecked, onclick: event => isChecked(event.target.checked) })
This is how it looks with targetAttr:
h('input', { type: 'checkbox', checked: isChecked, onclick: targetAttr('checked', isChecked) })
This makes it easier to forward events to Stream directly.
Stream
The stream API is based on the concept of getter/setter functions. These functions can be combined using helper method to create a stream of events that will trigger and transform the resulting values.
For more information on reactive programming you can look here.
SPUI streams are similar to flyd and mithril.js streams. They are just less powerful and have less features :)
valueStream(initialValue, transformer?) -> Stream
| Argument | Type | Required | Description |
|---|---|---|---|
initialValue |
any | Yes | Initial value of the stream |
transformer |
value => any | No | Function that will convert the the value each time the stream is invoked as a setter. |
| returns | Returns a Stream wrapping value |
Description
valueStream creates a Stream. A Stream is a function that act as a getter when invoked with no parameter. It act as a setter when invoked with a single parameter and it notifies it listeners that its value has changed.
If transformer is specified, each time the stream is invoked as a setter, it will apply the transformer function before setting the sream backing value.
const model = valueStream(42);
// stream called with no param: getter
console.log(model());
// stream called with a param: setter
model(71);
// Prints 71
console.log(model());

const doublingModel = valueStream(42, value => value * 2);
console.log(doublingModel()); // Prints 84

doublingModel(21);
console.log(doublingModel()); // Prints 42
addListener(stream, listener) -> FunctorToStopListening
| Argument | Type | Required | Description |
|---|---|---|---|
stream |
Stream |
Yes | The stream to listen for value changes |
listener |
value => void |
Yes | callback to be invoked when the stream value is updated |
| returns | () => void |
Returns a function that will stop listening for value changes when invoked |
Description
Add a listener to be notified when the stream value changes:
const model = valueStream(42);
const stopListening = addListener(model, value => {
    console.log('Model has changed: ', value);
});
// prints: Model has changed: 11
model(11);
stopListening();
// This won't print anything.
model(22);
removeListener(stream, listener) -> void
| Argument | Type | Required | Description |
|---|---|---|---|
stream |
Stream |
Yes | Stream to stop listening to |
listener |
() => void |
Yes | Original listener |
Description
Stops listening to value changes of a particular stream.
addTransform(stream, transformer) -> void
| Argument | Type | Required | Description |
|---|---|---|---|
stream |
Stream |
Yes | Stream that will be added a transformer function |
transformer |
value => any |
Yes | Function that will transformed the value before setting it in the stream. |
Description
Modifies a Stream and add a transformer function to it. This transformer will be invoked each time the stream is used as a setter.
const model = valueStream(42);
// Prints 42
console.log(model());
// Modify the stream itself by adding a transformer:
addTransform(model, value => value * 2);
// Prints 84
console.log(model());
computeStream(functor) -> Stream
| Argument | Type | Required | Description |
|---|---|---|---|
functor |
() => any |
Yes | A Function that can contains any number of stream usages and that returns any value. |
| returns | Stream |
Returns a computed stream that updates when any of its dependencies are modified. |
Description
compute creates a new computed stream that is the result of evaluating a functor containing stream usages. Each time any of the dependency stream changes, the value of the computed stream is updated.
const firstName = valueStream('Donald');
const lastName = valueStream('Knuth');
const fullName = computeStream(() => {
    return firstName() + ' ' + lastName();
});
// Prints: Donald Knight
console.log(fullName());
lastName('Duck');
// Prints Donald Duck. And loses all respect.
console.log(fullName());
Notice that the computed stream cannot be used as a setter. Its resulting value is ALWAYS the result of the computation.
fullName('Donald the Mighty');

// Still prints Donald Duck.
console.log(fullName());
compute(functor) -> Computation
| Argument | Type | Required | Description |
|---|---|---|---|
functor |
’() => any’ | Yes | A Function that can contains any number of stream usage and that returns any value. |
| returns | Computation |
Returns a Computation that contains a computed stream and its dependencies. |
Description
Similar to computeStream above but also returns the lists of all dependencies used to evaluate the computedStream.
Computation declaration
export interface Computation {
    computedStream: Stream;
    dependencies: Stream[];
}
map(stream, transformer) -> Stream
stream |
Stream |
Yes | Stream we will react to in order to apply a transformer |
transformer |
value => any |
Yes | Function that will transform the value before setting it in the stream. |
| returns | Stream |
Returns a new stream |
Description
Creates a new Stream that will invoke transformer function each time the original stream is changed.
const model = valueStream(42);
// Create a new stream that maps the original model value:
const mappedModel = map(model, value => value * 2);
// Prints 42
console.log(model());
// Prints 84
console.log(mappedModel());
model(11);
// Prints 22
console.log(mappedModel());
ObservableArray
ObservableArray is a wrapper over builtin javascript array. It reimplements all the mutators functions (push, pop, splice, shift, unshift, sort, reverse) and broadcasts events to listeners when any of those mutators are called. As an example of usage, SPUI elementList listens to changes happening in an ObservableArray to update the DOM by adding or removing new HTML Element.
ObservableArray declaration
class ObservableArray<T> {
    array: T[];
    listeners: ArrayListener[];
    constructor(array?: T[]);
    readonly length: number;

    push(...args: any[]): any;
    pop(...args: any[]): any;
    reverse(...args: any[]): any;
    shift(...args: any[]): any;
    splice(...args: any[]): any;
    sort(...args: any[]): any;
    unshift(...args: any[]): any;
    remove(value: T): void;

    applyChanges(changeFunctor: () => any): any;
    addListener(callback: ArrayListener): () => any[];
    removeListener(callback: ArrayListener): any[];
}
addListener(arrayChangeListener) -> RemoveListenerFunctor
| Argument | Type | Required | Description |
|---|---|---|---|
arrayChangeListener |
see below | Yes | A function that gets called when any of the ObservableArray mutators gets called. |
| returns | () => void |
Returns a function that when invoked will stop listening for array changes. |
Description
Array change listener declaration
(op: string, args: any[], opReturnValue: any) => void
op: name of the mutator that was invokedargs: arguments passed to the mutatorsopReturnValue: result of the mutator invocation
addListener allows to receive notifications when the ObservableArray is modified. It returns a function that when invoked will stop listening for changes.
See Filter.srcChanged or elementList.onModelChange to have examples on how to react to ObservableArray changes.
removeListener(arrayChangeListener)
| Argument | Type | Required | Description |
|---|---|---|---|
arrayChangeListener |
see below | Yes | Original array listener to stop listening on. |
Description
Stops listening to the ObservableArray changes.
applyChanges(changeFunctor) -> any
| Argument | Type | Required | Description |
|---|---|---|---|
changeFunctor |
() => any | Yes | A function invoking multiple mutators. |
| returns | any | Returns whatever the changeFunctor returned. |
Description
applyChanges will invoke changeFunctor and during that invocation all mutators caled on the ObservableArray will have their notification batched in a single event called changes allowing a listener to process all notifications at once.
const obsArray = new sp.ObservableArray<number>();

obsArray.addListener((op, args, returnValue) => {
    console.log(op, args, returnValue);
});

const finalValue = obsArray.applyChanges(() => {
    obsArray.push(1);
    obsArray.splice(0, 1, 42);

    return obsArray.length;
});

// When this resolve the listener will print this:
// changes [['push', [1], 1], ['splice' [0, 1, 42] [1] ]]

// Notice that finalValue === obsArray.length
Filter
Filter declaration
class Filter<T> {
    src: ObservableArray<T>;
    filtered: ObservableArray<T>;
    predicate: FilterPredicate<T>;
    constructor(src: ObservableArray<T>, predicate: FilterPredicate<T>);
    applyFilter(predicate?: FilterPredicate<T>, reset?: boolean): Changes;
}
constructor(src, predicate)
| Argument | Type | Required | Description |
|---|---|---|---|
src |
ObservableArray |
Yes | ObservableArray that will be filtered. |
predicate |
value => boolean |
Yes | Predicate invoked to filter each value of src. |
Description
Creates a new Filter object from an src ObservableArray. Filter contains a filtered ObservableArray that is the result of applying the predicate function to all of the values of src. Each time any of the mutators function of src is invoked, filtered is kept up to date.
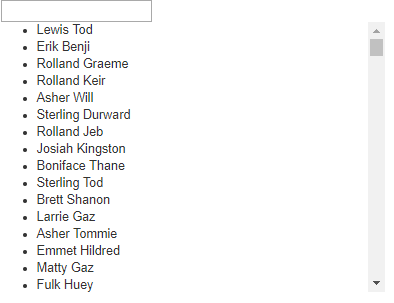
Here is how you would update a list of names as a user types a pattern in a input:
const models = new ObservableArray();
for (let i = 0; i < 1000; ++i)
    models.push(generateName());
const match = valueStream('');
const filter = new Filter(models, (model) => {
    return match() ? model.indexOf(match()) > -1 : true;
});
const triggerFilter = map(match, () => filter.applyFilter());
h('div', {}, [
    h('input', { oninput: targetAttr('value', match) }),
    // elementList will update <ul> when new elements are added or removed due to filtering
    elementList('ul', { style: 'height: 300px;overflow: auto' }, filter.filtered, (listNode, model, index) => {
        return h('li', {}, model);
    })
]);
In the above example, notice we use filter.filtered as the source ObservableArray to build the elementList. This means each time filtered is udpated due to filtering, the elementList is kept up to date.
applyFilter(predicate?, reset?) : Changes
| Argument | Type | Required | Description |
|---|---|---|---|
predicate |
value => boolean | No | New predicate to set in the Filter. |
reset |
boolean |
No | Will empty the current array and filter it from scratch (this creates less notifications). |
Description
Reapply the predicate over the values of the src array of the filter. This needs to be called if the predicate has changed. You can also use this function to change the predicate altogether.
SPUI Inspiration
SPUI owes a lot to Mithril JS. This is the first vdom framework I used and this is where I discovered that I like to use hyperscript. When creating SPUI, I wanted to have a similar syntax but to work directly on the DOM.
Redom is another source of inspiration. This is a tight framework that is totally DOM based. I modeled SPUI elementList API over Redom list. Redom list have to be refreshed manually though. This makes it simpler to reconcile the DOM but makes the update less magical :)
Surplus-js has been another inspiration. This is a lightning fast library that is also DOM based and that updates automatically.